07 Jan 2019
Intro
Ran into a little fun time at work recently. A user was intermittenytly seeing WhatsApp fail to connect. Poked around for a bit and figured out that we didn’t have all the required ports open on our guest wifi network. I spent a while trying to track down a definitive list of ports that are necessary for WhatsApp. Found some dated and inaccurate references scattered around, but finally got a true list from their support team. Enjoy!
Ports
| Protocol |
Port Number |
| TCP |
80 |
| TCP |
443 |
| TCP |
5222 |
| UDP |
3478 |
| UDP |
53 |
| UDP |
40020 |
| UDP |
57923 |
13 Sep 2018
Intro
If you got inspired by the previous post and setup your nice, new Mikrotik Hex router, you might want to configure dynamic DNS on it as well.
The advantage of dynamic DNS is that you get a nice hostname to ssh to/reference even though the underlying IP address might change. I’ve had Centurylink fiber as my ISP for about 6 months, and my IP address has changed a couple of times. Nothing too crazy, but it’s nice to just have a hostname and not have to worry about the ip address.
The steps below are pretty simple and should only take 5-10 minutes to setup. With this setup, every two hours the router will see if the IP on the interface has changed. If it has, the router will call out to FreeDNS to update DDNS.
Configuration
Step 1 - Get a FreeDNS account and subdomain
Go to http://freedns.afraid.org/ and register an account. Then, go to http://freedns.afraid.org/subdomain/edit.php and add your desired subdomain with an A type DNS entry.
“Destination” is your current IP address.
Step 2 - Grab your DDNS update token
Go to http://freedns.afraid.org/dynamic/ and click the “Direct URL” entry. Grab your update token. It’s everything after “update.php?”
Step 3 - Create the DDNS update script on the router
Open up your Mikrotik terminal and copy-pasta the following script. This script will do the DDNS update if needed.
(Obviously, change the script to the correct UNIQUE key required to update your Dynamic DNS service)
/system script
add name="ddnsupdate" policy=ftp,password,policy,read,reboot,sensitive,romon,sniff,test,write source={/tool fetch address="freedns.afraid.org" host="freedns.afraid.org" mode=http src-path="dynamic/update.php\?YOURTOKENHERE" keep-result=no
}
Step 4 - Create an IP check script to see if DDNS update is needed
To prevent spamming the FreeDNS servers to see if we need to update our IP address, we can do it locally on the router with the following script:
/system script
add name="checkcurrentip" policy=ftp,password,policy,read,reboot,sensitive,romon,sniff,test,write source={
:global currentIP;
:local newIP [/ip address get [find interface="pppoe-out1"] address];

:if ($newIP != $currentIP) do={
    :log info "ip address $currentIP changed to $newIP";
    /system script run ddnsupdate;
    :set currentIP $newIP;
    }  else={
    :log info "No change of IP";
    }
    }
Step 5 - Setup scheduler to periodically check our DDNS setup
/system scheduler add name="Check IP and update DDNS" on-event="/system script run checkcurrentip" interval=2h
06 Jul 2018
Intro
Living in a burgeoning technology city like Portland, one would think you would have several options for
an ISP. However, like most places, Portland is limited to just two options: Comcast or Centurylink
(Google Fiber being the perennial tease).
Centurylink recently ran a special where you could get 100MBS fiber internet for 55$ a month perpetually,
supposedly without future price increases. I’m a cheap dirtbag, so the price was right.
Cneturylink tries to get you to use their crumby Zyxel router for something like 10$ a month.
With the setup below you can get rid of the subpar router that Centurylink wants to “rent” to you, and get
an “enterprise” level home network for about 150 bucks.
Inspired by the post here, I
decided to go with a Mikrotik Hex router.
The exact Mikrotik model I am using is this one: Mikrotik hEX RB750Gr3.
Coupled with a single Ubiquiti Unifi Long Range AP I get good (20-30Mbps) Wifi throughout
my two story home.
I’ve been really happy with my Mikrotik Hex router since I got it all setup over the winter holidays.
It uses very little power while still providing a lot of configuration options and advanced features for
my scrub-level networking skills.
Prequisites
-
Call Centurylink and get your PPPOE username and password
-
Open up all the guides and how-tos that you will need, as you will be without internet during setup.
-
A couple ethernet cables to connect your laptop to the router.
-
Download Mikrotik’s Winbox program if you want to use it: https://mikrotik.com/download.
-
Self-confidence! The setup looks complicated, but it should go pretty smoothly.
Configuration
Step 1
Plug the ethernet cable from your ONT into the far left port on the Hex router. Run a patch cable from the second from the left port on the router to your computer.
Step 2
Log into the router via Winbox or in your browser at 192.168.88.1. The default credentials are admin without a password.
Step 3
Go into System > Users and setup a new “full” user with an actual password. Log out from the admin account, and log back in as
the new user.
Step 4
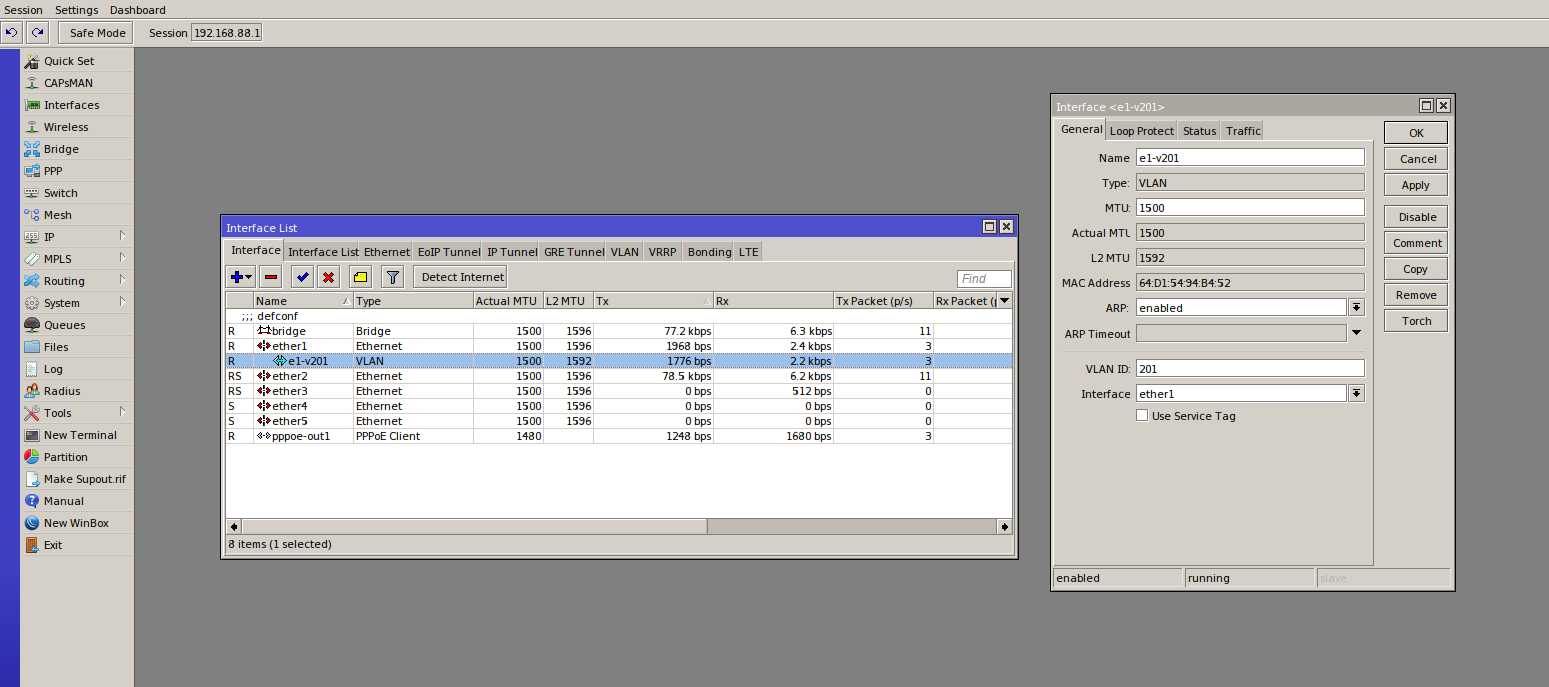
Open the Terminal on the router and run the following two commands to setup pppoe and the correct VLAN configuration for Centurylink:
/interface vlan
add interface=ether1 name=e1-v201 vlan-id=201
/interface pppoe-client
add add-default-route=yes disabled=no interface=e1-v201 name=pppoe-out1 password=yourpw user=youruser
Step 5
For some reason, Centurylink’s DHCP didn’t give me a DNS server, so I had to go into IP > DNS and setup a server there.
Use 8.8.8.8 for Google, or your DNS server of choice.
Step 6
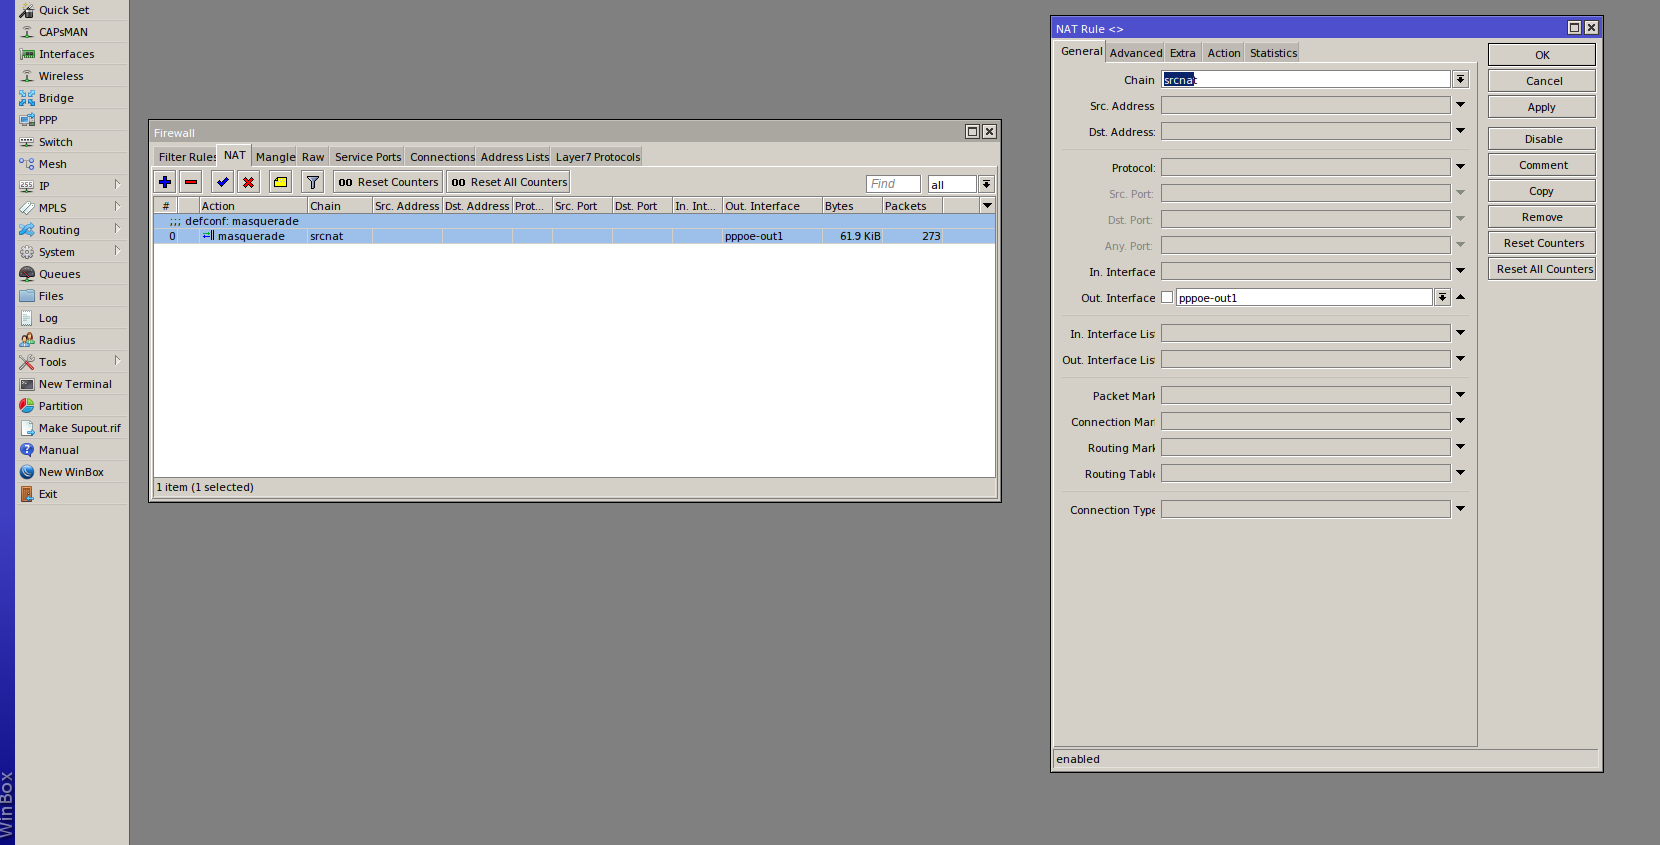
Open up the Terminal again and run the following command to configure the NAT masquerade rule to use our pppoe interface:
/ip firewall nat
add action=masquerade chain=srcnat comment="defconf: masquerade" ipsec-policy=out,none out-interface=pppoe-out1
Step 7
You should have internet at this point. Rejoice! Take the crappy Zyxel router back to Centurylink, and get them to stop charging you the monthly
router rental. Make sure to get a receipt or something, as they are known to forget that you don’t still have their router.
The next step would be to get a Wifi AP setup, which I will go over in a later post.
Here are some screenshots showing what the Interface and NAT Rules should look like at the end (right click > open in new tab for a larger image):


Troubleshooting
Below is the “/export compact” output from the Mikrotik router terminal. This shows all the settings that differ from the default settings. If you compare your own “/export compact” to the one below, you should be able to narrow down any relevant differences. If you’re still having trouble, feel free to add a comment, and I’ll try to help out:
/export compact
# jul/06/2018 21:15:00 by RouterOS 6.42.5
# software id = IMBD-LQQ9
#
# model = RouterBOARD 750G r3
# serial number = 6F3907EA0947
/interface bridge
add admin-mac=[redacted] auto-mac=no comment=defconf name=bridge
/interface vlan
add interface=ether1 name=e1-v201 vlan-id=201
/interface pppoe-client
add add-default-route=yes disabled=no interface=e1-v201 name=pppoe-out1 password=[redacted] user=[redacted]
/interface list
add comment=defconf name=WAN
add comment=defconf name=LAN
/interface wireless security-profiles
set [ find default=yes ] supplicant-identity=MikroTik
/ip hotspot profile
set [ find default=yes ] html-directory=flash/hotspot
/ip pool
add name=dhcp ranges=192.168.88.10-192.168.88.254
/ip dhcp-server
add address-pool=dhcp disabled=no interface=bridge name=defconf
/interface bridge port
add bridge=bridge comment=defconf interface=ether2
add bridge=bridge comment=defconf interface=ether3
add bridge=bridge comment=defconf interface=ether4
add bridge=bridge comment=defconf interface=ether5
/ip neighbor discovery-settings
set discover-interface-list=LAN
/interface list member
add comment=defconf interface=bridge list=LAN
add comment=defconf interface=ether1 list=WAN
add list=WAN
/ip address
add address=192.168.88.1/24 comment=defconf interface=ether2 network=192.168.88.0
/ip dhcp-client
add comment=defconf dhcp-options=hostname,clientid interface=ether1
/ip dhcp-server network
add address=192.168.88.0/24 comment=defconf gateway=192.168.88.1
/ip dns
set allow-remote-requests=yes servers=8.8.8.8
/ip dns static
add address=192.168.88.1 name=router.lan
/ip firewall filter
add action=accept chain=input comment="defconf: accept established,related,untracked" connection-state=established,related,untracked
add action=drop chain=input comment="defconf: drop invalid" connection-state=invalid
add action=accept chain=input comment="defconf: accept ICMP" protocol=icmp
add action=drop chain=input comment="defconf: drop all not coming from LAN" in-interface-list=!LAN
add action=accept chain=forward comment="defconf: accept in ipsec policy" ipsec-policy=in,ipsec
add action=accept chain=forward comment="defconf: accept out ipsec policy" ipsec-policy=out,ipsec
add action=fasttrack-connection chain=forward comment="defconf: fasttrack" connection-state=established,related
add action=accept chain=forward comment="defconf: accept established,related, untracked" connection-state=established,related,untracked
add action=drop chain=forward comment="defconf: drop invalid" connection-state=invalid
add action=drop chain=forward comment="defconf:  drop all from WAN not DSTNATed" connection-nat-state=!dstnat connection-state=new in-interface-list=WAN
/ip firewall nat
add action=masquerade chain=srcnat comment="defconf: masquerade" ipsec-policy=out,none out-interface=pppoe-out1
/system routerboard settings
set silent-boot=no
/tool mac-server
set allowed-interface-list=LAN
/tool mac-server mac-winbox
set allowed-interface-list=LAN

